The art of weaving knots in Slavic culture was equated with pagan rituals, because amulets and amulets were made using precisely this technique. In our time the art of macrame has become not just fashionable, but also a practical hobby. Modern craftsmen combine weaving with decor from beads, rhinestones and semi-precious stones. Let’s try to master this interesting technique ourselves.
How to make macrame correctly using weaving patterns
Introduction to macrame weaving patterns for beginners
You can weave not only panels and hammocks using the knot weaving technique. Craftswomen create earrings, necklaces, belts and lace to decorate clothing items.
First you need to decide on the quality of the threads for weaving and take into account several nuances:

To work, you will need a board or a book in landscape format. Some craftswomen threads are attached to a special tube or a rod of small diameter. But weaving knots in a canopy requires some preparation.
Preparation before work:

Now you can weave the first training knots on this blank.
Macrame weaving knots and patterns for beginners
A single flat knot consists of one loop. How to do this can be seen in the diagram.

A double flat knot is used for weaving floss baubles or other types of threads. Pay attention to the weaving sequence: each next knot should be a mirror image of the previous one. Otherwise, the resulting flat thread will begin to twist in a spiral.


From square knots you can weave a rhombus, as shown in the diagram.

The number of nodes is measured in tens. We will look at basic techniques with corresponding diagrams.
Knot chain.

Chameleon knot.

Tatting knot.

In the diagram you can consider and try other, no less beautiful techniques for creating knots.

Schemes for weaving panels on the wall using the macrame technique (with step-by-step photos)
A wall panel is a great opportunity not only to practice weaving techniques, but also an opportunity to create an original piece for your interior with your own hands.
For the panel you will need:
- 10 threads, 5 m each; scissors;
- wooden plank 45-50 cm long (it will become part of the future panel).

Operating procedure:

Diversify your home decor and create original jewelry You can also use -beaded flowers-.
How to weave a macrame belt (master class for beginners)
To work you will need:
- beautiful buckle with cross fastening for threads:
- silk or synthetic threads - 3 pcs. 10 m each;
- scissors.
Operating procedure:
- first you need to master weaving a double flat knot with a central thread (you can choose a different color for the central thread);

- attach the threads to the buckle as shown in the picture;

- to finish weaving, use the “diagonal bead roller” knot, as shown in the diagram;


Using this technique you can weave a watch strap.


Pattern for weaving macrame for flower pots (step by step for beginners)
DIY weaving patterns for macrame flower pots are varied and popular among craftswomen. Some people weave flowerpots from the top edge, others start weaving from the bottom. Let's look at simple schemes for beginners.
For work and training you can use threads cut from old colored T-shirts. How to make such yarn can be seen in the photo.


Scheme for weaving flower pots from below:

To work you will need:
- 8 thread blanks, 2-3 m each (depending on the height at which you plan to hang the pot);
- a flower pot; scissors.
Operating procedure:

Using the same pattern, you can weave a flowerpot, starting from the top. To do this, you will additionally need a ring for attaching threads. The lower part can be tied with a common knot and a second tier can be made for the second pot.


Here are some examples of interior design using simple flowerpots.


If you have a ready-made flowerpot, but no fresh flowers, you can make beaded trees with your own hands.
Knots can be used to create many practical and sophisticated things. Designer jewelry is highly valued, and the abundance of blanks for jewelry and decorative elements in handicraft stores will allow you to create original pendants and earrings. Original beaded bracelets will be a worthy addition to the set.
To begin with, you can practice on simple patterns and weave, for example, a keychain. For additional registration you you will need large beads, a key ring and colorful cords. How to do this can be seen in the diagram.


Handicraft stores are a separate universe, once in which it is no longer possible to leave without buying something. -Beaded brooches look exquisite and elegant, because no one else in the world will have these.
Pendants and necklaces can be made from any available materials. Lace, multi-colored threads and cords, multi-colored beads and openwork decorations are used. The operating procedure and diagram can be seen in the photo.
Video with a step-by-step master class on weaving macrame for beginners
- A macramé owl in the form of a keychain can become your friend, and a simple weaving pattern will help you weave it in one evening. For the owl's eyes you will need several large beads. Look at other ideas - bead crafts - maybe you will find new ideas for inspiration.
- The technique of weaving a glamorous leash and collar for your favorite dog from macrame is shown in a detailed master class. This is how you can please your four-legged friend with your skills.
- The video shows a detailed master class on weaving a bag using the macrame technique using a simple pattern. A detailed story about the choice of material and additional tools that you may need during the work process.
Write how you liked the idea of weaving original macrame jewelry? We welcome any comments.
The main components of macrame have already been mastered; you can begin making the first simple product using the macrame technique - flower pots. To make your flower pot beautiful, we tried to make a selection of master classes on weaving flower pots using the macrame technique with our own hands.
Look how modern and aesthetically pleasing these planters look.
Do-it-yourself Gardens of Babylon

Beautiful wall decoration
Pots are not at all a whim for plants, and all flower lovers know this. Hanging, climbing plants feel and look best in hanging flowerpots.

Plants in the interior look much more elegant if the flower pots are decorated with weaving using the macrame technique.

Material for flower pots
What material is needed for pots using the macrame technique? The material must be durable, not easily soiled, pliable, elastic, and not slippery.

To make the knots clear and expressive, you need to weave them tightly enough.
As for the color scheme, everything is at your discretion. Here are some examples:


Pots for several flowers can be of the same color...


Basic rules for creating a simple flowerpot (for beginners)
1) Select a design and suitable material.
2) Cut the threads into pieces of the required length.
3) We fasten the threads on a working basis. There should be four ends (sometimes three or another number).
4) Make a loop for hanging the flowerpot. A ring is often used for fastening.
5) Then we begin to knit twisted. They need to be knitted in four of the required length (or another number, according to your plan).
6) Measure the diameter of the pot so that it fits well in the flowerpot.
7) Select a pattern of knots with which we will braid the base - the flower pot. Most often this is .
8) We knit a recess for the flowerpot.
9) At the end, we secure the work with a tight knot so that the flowerpot does not fall out of the flowerpot.
10) Cut the threads, leaving the ends long. They can be fluffed or beads attached to them to give the product an original look.

Pattern for weaving flower pots using macrame technique for beginners
You will need:
- cord with a diameter of 5 mm (length 40 m)
- metal or wooden ring with a diameter of 4.5 cm

Cut the cord into 8 pieces of 5 m each.
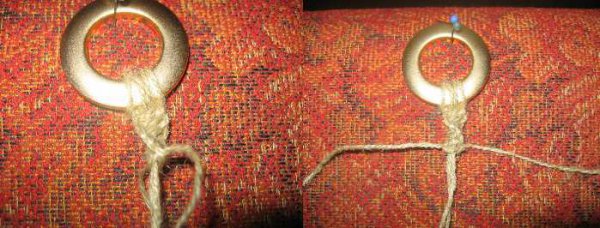
Fold the thread so that one end is 3.5 m and the other 1.5 m and secure it to the ring. Make a loop by bringing it under the ring. Bend it over the base towards you and pull the ends of the thread into the loop. Lock on the bottom.

Fasten parts of the rope to the ring so that 2 long (working) parts are located along the edges, 2 short (axial) parts are located between the long parts.
To prevent the threads from getting in the way, tie them into a skein and secure with rubber bands

We weave the handles of flowerpots
Divide all the threads into 4 groups (2 long and 2 short parts). Weave single long pieces of rope.
You need to tie approximately 30 knots or approximately 50 cm (their number depends on the thickness of the rope and the required length of the product).

Secure the twisted chain with two flat knots:

Weave three more twisted chains in the same way.

We weave a basket for a flowerpot
To do this, weave 1 flat knot with two right ropes from one group and 2 flat knots with left ropes from the group closest to the right at a distance of 8 cm from the last knots. We repeat 4 times, sequentially including all the ropes in a circle.

We measure 8 centimeters...

...we fasten the threads with a flat knot...

Knit three rows of warp.

Step back a little from the last knots and use the braiding method to gather the ropes into one bundle.

Braid method
The braid must be very strong so that the flower pot does not break!
We pull all the threads into a bundle. Take a piece of thread, fold it in half and add it to all the threads with the loop facing up.

Using one thread from the bundle from top to bottom, we make several turns.

We insert the end of the cord into the loop and pull the ends of the loop down so that the cord comes out from below under the turns. Pull the second end of the loop up and pull it under the winding.

Carefully cut off the upper end of the thread, and hide the lower end along with the rest of the threads.

Braid weaving pattern
Leave the length of the thread for the tassel about 20 - 30 cm, cut the ends with sharp scissors. The pot is ready!
Video tutorial on weaving a simple flowerpot for beginners:
Two-level flowerpot “Juliana” using macrame technique
Most often, a flowerpot is woven for one flowerpot, but it can be two (or more) level. The shape, size, patterns, and material for it are also very diverse.
The Juliana plant pot is woven from ordinary linen cord. It is designed for two flowers, located above and below.

Finished product length is about 70 cm
Required material:
- linen cord 5 mm thick (length 40 m)
- 2 rings with a diameter of approximately 4 and 6 cm
- 8 beads for decoration
The procedure for weaving pots “Juliana”
1) Cut the cord into 8 pieces of 5 m each. Mark the middle of the thread.
2) Make a ring for fastening. We take 4 threads, place them parallel and horizontally to each other. From the marked middle weave “up” and “down” about 8 flat square knots. We fold this resulting lace in half and thread it through a ring of smaller diameter. And if you don’t have a ring, then weave a few more knots, make a “loop” and tie 1-2 flat knots on all cords to strengthen it. Another option is to secure the thread using the braiding method.
3) We divide 8 ropes into 4 groups of 2 pieces and weave about 6-8 knots. It can be replaced with ordinary flat knots or weaved in a twisted chain.
4) We fasten it on the second ring, 5-6 cm away from the last knot, using horizontal rep knots. Between these cords we hang the remaining threads, folded in half. Now we have 16 threads at work.
5) Weave beads. We divide the threads into groups of 4 pieces. We knit 8 flat knots in each group, first weaving in one bead for decoration. Then we weave 2 more flat knots, weave a second bead and again 8 flat knots.
6) We weave the base for the first pot. We retreat 5 cm from the last knots, weave twisted chains, working with threads from neighboring ropes, shifting the knots.
7) Check if our flowerpot fits. If it doesn’t fit or, conversely, falls out, undo the knots and tie them correctly. Weave twisted chains about 20-25 cm. (Their length depends on the height of your pot.)
8) Weave the base for the second pot. We retreat 10-12 cm from the last knot, using 2 threads from adjacent chains, weave one flat knot each.
9) Again we retreat 12 cm, collect all the cords using the braiding method.
Be sure to try on the pot when you finally secure the threads. This will be the place for the second pot. It should fit there securely.
10) Design of the “tassel”. Back off 25-30 cm and cut the cords. You can fluff them, untwist them, or add beads for greater decorativeness.
To make it clearer, watch the video on how to knit a “Juliana” flowerpot:
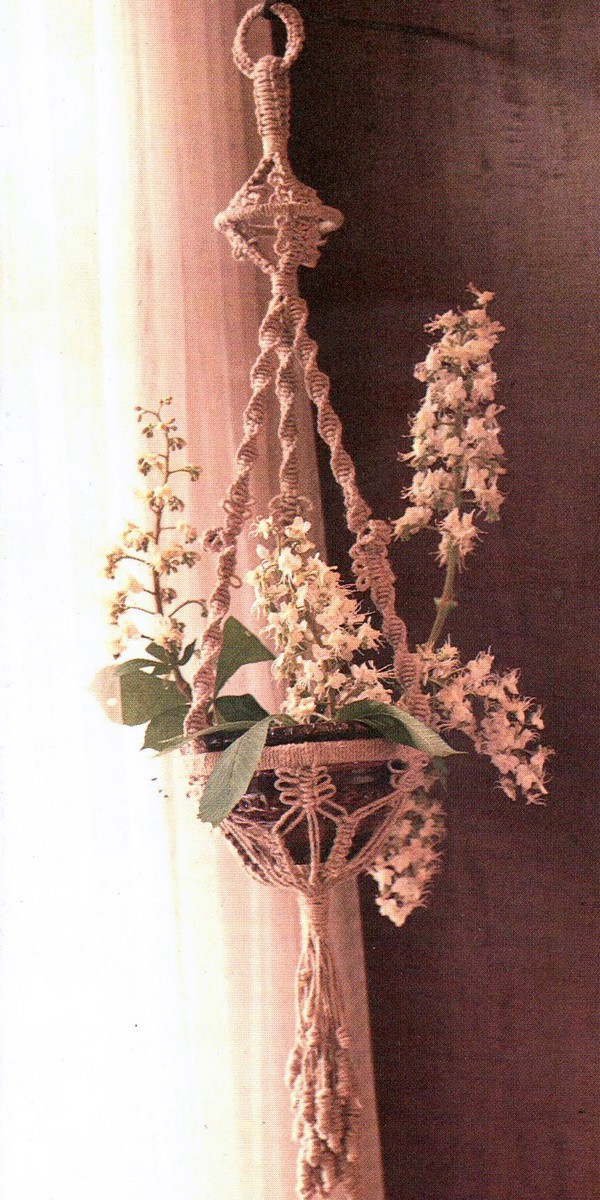
Openwork flowerpot with “Butterfly” pattern
To weave such an openwork flower pot you need:
- rope – 50 m
- three rings with a diameter of 7 cm, 10 cm and 21 cm
- scissors
- pins for fastening thread
- work pillow
- hook for attaching flowerpots
Operating procedure
1) Cut the threads: 3 parts of 8 m, 6 parts of 3 m, 2 parts of 1 m, 1 thread - 2.5 m
2) Wrap the 10 and 21 cm diameter rings tightly with rope so that there is no gap. A ring with a diameter of 7 cm must be braided with double flat knots with a thread 2.5 m long.

Diagrams of the main macrame components of this flowerpot
3) Marking the middle, lay all the threads vertically and secure them in the middle with pins.
Place the shortest ones (meters) along the edges. With these threads, tie 8 cm chains of double flat knots in both directions from the middle. All other threads will be the basis.
4) Distribute the threads by 6 (long ones - along the edges) and in each part, first tie a chain of 4 double flat knots, then make 4 more of the same knots, leaving 3 picot air loops between them (Butterfly pattern , rice. 6).
5) Using horizontal rep knots, secure the ends of the chains ( rice. 2) on a ring with a diameter of 10 cm. Next, first weave 3 “butterflies”, and then simple chains of 4 knots without picot. Tighten the bundle of cord under the chains using the “braid” method.
6) Again divide the threads of 6 into groups and tie 3 hanging cords 40 cm long. Weave each one like this: first with single flat knots of 17 cm of twisted chain, then a “butterfly”, then a “pea” ( rice. 8), again a “butterfly” and then 13 cm of twisted chain.
7) Secure the ends of the hanging cords to a ring with a diameter of 21 cm, tying 3 threads in between them (a total of 9 threads of 1 m each, folded in half). On every 6 threads under the ring, make a “butterfly”.
8) Connect together the two outer cords from the adjacent butterfly patterns and tie 6 chains of 6 double flat knots, leaving the two inner ones free. We make a bundle of all the threads and tighten it using the “braiding” method.
We decorate the ends of the cords with “rollers” ( rice. 12). The finished length of the knitted brush is 25 cm.
Video tutorials on weaving flower pots using the macrame technique
Channel Macrame style will teach you how to weave a two-color openwork flowerpot for indoor flowers:
Channel Macrame School teaches how to weave a hanging flower pot with round beads:
Channel Panduro Webtube shows how to weave simple flowerpots with large beads:
The originality of the macrame technique is that by spending a little money and time, you can decorate your home with a useful and pleasant decorative element.

Macrame flower pots are not just an opportunity to hide an old and ugly pot. Although, translated from French, pots mean “hidden pot.” This is an opportunity to use your creative potential, give space to your whimsical imagination, and create a stylish and beautiful thing using available materials. You can also place hanging plants in a small space, elegantly decorate a summer veranda, decorate the wall of a country house, close the opening on the open terrace, and improve the balcony. Creativity and economic efficiency will allow you to create a stylish and useful item from unnecessary waste or scrap materials.
If you make flower pots from macrame with your own hands, you can choose the desired size and the required number of levels of the item, decorate it to your liking, create a target element of your chosen design style, and even simply decorate a flower pot that is intended as a gift. The undoubted value of such a process lies precisely in the independence of choosing and implementing a mini-project. But if such an act of creativity is undertaken for the first time, you can always look at publications or websites about macrame for beginners to get a rough idea of exactly how, with what techniques and materials you can start your needlework.
Fans of home mini-gardens, green balconies, and summer decorative terraces know that there are times when hiding a pot is simply necessary. This happens when it is vital to replant a flower (an old container has broken or the plant has grown to a critical state), but there was nothing decent at hand, and I had to use improvised means, such as a coffee can. Sometimes the season is simply not conducive to replanting, and a sloppy container spoils the entire appearance of the room. It is often cheaper and faster to hide an old pot than to buy a new one and replant the plant. In this case, there is usually simply not enough space on the window sills. This also happens at work, when an ampelous plant cannot be placed otherwise than by hanging it. For such cases, there is a decorative flowerpot.
This device doesn't have much functionality. There is no drainage hole in it, and you cannot plant an indoor flower in it. This is a kind of vase in which the plant is placed after being placed in a container intended for this purpose. But it is precisely the decorative nature of the element that suggests an infinite number of forms in which it can be presented - from a beautiful stone vase in the shape of a glass on a leg to a plastic cone with a handle, in the bottom of which decorative lighting is built in, from an old teapot decorated in a fancy way to a jewelry masterpiece made of silver.
Flowerpots made in the macrame style have been used for so long that they managed to go out of fashion during the years of the utilitarian approach to home and office furnishings and again became a modern trend. Because in the era of mass production, what is made by human hands, individual, original, and original is increasingly valued. Macrame weaving has become one of the most common and unique ways of self-realization and decoration at the same time.
Materials and available tools
One of the ancient types of needlework, widespread in ancient times, the name of which comes from the Arabic language and literally means “lace” - do-it-yourself macrame - is nothing more than weaving with knots.
The knot is an old human invention, used in navigation, agriculture, cargo transportation and even writing. The reliability required of it presupposed its functional features and variable forms. The beauty of purpose attracted the attention of lovers of beauty, who saw in this the opportunity to create beauty from a utilitarian and functional working element. With the help of macrame, which used artistic knot weaving, shawls and bags, belts and pendants, scarves and wallets were created. Decorative items made using this technique were even more whimsical - rugs and curtains, napkins and tablecloths, bedspreads and flowerpots.
The variety of application options also gave rise to variability in the means of implementation used.
Initially, only natural materials were used, cotton and linen were especially popular, but jute, hemp, abaca, and wool were also not ignored. In the era of polymers, synthetic materials have become popular, which are distinguished by their bright colors, high strength, ability to retain their shape, and durability of use. The use of such threads made it possible not to subject the material to preliminary heat treatment. After all, natural fibers must be boiled so that the product made using the knotted technique does not lose the shape that the master gives it.
Macrame flower pots when creating require the indispensable use of available materials. After all, it is intended for a heavy pot, which will deform the original outlines with its weight. Auxiliary means are masked by knots or become an independent decorative element, but at the same time they carry a functional load, acting as a solid base or stiffener. But choosing the means at hand should not be particularly difficult. That's why they are called improvised because they use everything that is at hand - from an old key ring to a plastic rim from a mayonnaise bucket. It all depends on what the product is intended for.
A twine planter can make do with a ring from a child's broken pyramid, a larger diameter cord can be used with an unnecessary wooden ring from an old curtain, and a very thick rope can even be used as a seat from a small chair on which a child has not been able to fit for a long time.
Weaving macrame with your own hands means that the entire process, starting from the choice of material, available tools, shape and technique, is carried out independently. Because it involves creativity and self-realization.

Tools and accessories
The most necessary tool in this case is a pair of hands, even if they are not very skillful. You will need instructions in order to master the technique of knitting knots. You shouldn’t start with particularly complex actions: for a flowerpot that carries a functional load, you don’t need particularly fancy patterns. And it’s difficult to immediately learn how to knit double, triple, yarn over and other intricate configurations. The skill will come with time. Previously, there were special devices for macrame; now a clean table or a crossbar from a chair is quite suitable to tighten the knot. The macrame technique involves not only certain placement patterns, but also the preferred intensity of tension that is created when force is applied.
Flower pots are made from a variety of materials, from an old T-shirt cut into strips to strips of leather and clothesline. In any case, you cannot do without a sharp shoe knife, equally sharp sewing scissors, T-shaped pins for securing the ends, and a macrame board. A special surface marked into squares can be purchased at any craft store, but many women get by just fine without it, using a piece of plastic, a cutting board, or several sheets of cardboard glued together. The board for macrame must be lined so that it does not go astray when weaving a pattern from a symmetrical pattern.

Sewing threads, a metal knitting needle, or the same ruler (or a strong wooden one) may come in handy. Macrame can also be used as a decorative element attached to pots. Then you can't do without glue. You need a minimum of available tools and devices, but you cannot do without hands, a head and a burning desire to create.
Nodes and scripts
Creating any flowerpot takes a little time and is carried out in several stages:
- preparation of the workplace and necessary materials;
- cutting the rope (or cord) into the number of pieces required for the circuit;
- pulling the segments through the ring for hanging and securing them to it with knots (creating a base);
- determining the starting point for weaving the mesh in which the pot will be placed;
- knitting knots on the starting line of the future location of the flower pot;
- weaving levels with a consistent reduction in the distance between them (this will give a step-by-step reduction in diameter);
- securing the ends at the last, narrowest level, on a ring-stand or simply a large decorative bunch with one strong knot.

This is the simplest version of the scenario, which does not even require the provided scheme. The larger the basket, the larger the pot will fit in it, but heavy contents require both strong rope (and this will reduce the possibility of tying complex knots) and an equally strong ring for hanging. If the rope is polymer and thick, you will have to tinker with knots that naturally do not want to be secured in the required position.
The scenario may involve a two-tiered placement of the basket, and several nets on a strong wooden crossbar, either in one line or at different levels. To weave flowerpots, you can use a ready-made pattern, but you don’t need much imagination in arranging two types of knots in a checkerboard pattern. A pattern is required only if a particularly complex pattern is being woven. To do this, you first need to learn how to perform the simplest techniques well and bring the movements of your fingers, habitually folding a rope, to automaticity.
It’s quite difficult to learn to knit from pictures. Any person who has tried to learn anything by looking at illustrations will confirm this. Therefore, it is optimal to find someone who can clearly and patiently demonstrate the first, most difficult skills and movements.
As a conclusion
Macrame is a technique that has been used at all times to create unique products for a wide variety of purposes. Weaving a pendant for a flower pot in this style is a constructive idea, using which you can use any available materials - nylon cord, twine, thick clothesline, strong threads, wire in a soft colored plastic braid, strips of knitwear, jute, hemp fibers. And you can also decorate it in any style, using beads, buttons, pendants, fabric inserts, lace, and ribbons.
All that is required for such small, original works is patience, imagination, ingenuity and the need for self-realization, the desire to decorate the interior, improve the balcony, and add decorativeness to a small garden plot. You can learn anything if you start with the simplest things, and then everything will be just a joy - to do it, to brag about it, and to admire it.
Weaving flowerpots from scrap materials using the macrame technique is a very popular type of needlework. Macrame is perfect for those who love to knit, because weaving crocheted pots and flowers using the macrame technique is a great way to relieve stress, calm down and relax after a busy day. In order to master the technique of weaving simple products (for example, macrame flowers), it is enough to learn how to knit basic macrame knots.
Having learned to knit basic knots and navigate various weaving patterns, the needlewoman will be able to weave intricate patterns and create real masterpieces from scrap materials.
Hanging wicker vases for indoor flowers, made by hand using the macrame technique from twine or other types of rope, are very popular. Novice craftswoman easy to handle weaving flower pots made of twine according to a simple pattern, if you master a few basic rope weaving techniques. The main thing is to choose a simple design, and then a wicker hanging flower vase, made with your own hands from scrap materials, will turn out beautiful and comfortable. Flower lovers will certainly be delighted with this gift. A wicker flower pot will undoubtedly decorate any interior.
A do-it-yourself flower vase made from scrap materials using the macrame technique is a beautiful and functional thing. You need to weave such a product according to the pattern. Experienced craftswomen can weave pots made from twine according to your own pattern, but novice needlewomen are, without a doubt, recommended to weave flower pots according to a ready-made pattern. Do-it-yourself weaving from twine or other types of rope is usually not difficult for beginners.
The main thing is to strictly follow the pattern, and then a novice craftswoman can easily make a real masterpiece out of ordinary rope with her own hands. Attention: you need to choose a rope from which it is convenient to weave, otherwise serious difficulties may arise during the work process. In order to make an original basket for indoor plants from scrap materials, beginning weavers will need:

Having prepared everything you need, you can start weaving. Weaving macrame is a type of needlework that requires practical skills, attentiveness and perseverance. You can't be distracted while working, need all the time follow the diagram. Of course, a novice craftswoman who is taking on such a large thing as a flower pot for the first time will have to work a little hard, but the result, no doubt, will be beyond praise. An elegant flowerpot will become a “second home” for your favorite indoor plant, and the interior of the room will change for the better thanks to an original handmade product.
Gallery: macrame - flower pots (25 photos)


Do-it-yourself macrame flower pots: general description of work
In order for the pots for indoor plants to turn out smooth, beautiful, and symmetrical, you need to take the work seriously. Weaving should be done at a desk or dining table, in a well-lit room, with a table lamp. Before starting work, a novice craftswoman must clearly understand the sequence of actions for making a flower pot:

During weaving, you should strictly ensure that all the knots are approximately the same size, and they should also be smooth and beautiful. Usually at the first stages of learning the macrame technique for beginner needlewomen You often end up with crooked knots, but with experience this goes away, and your weaving skills are gradually brought to full automatism. Therefore, before you take on any large-scale product, you should definitely practice on something simpler. Then the product will turn out even, knot to knot, and will definitely be appreciated.
It is best to start with products of small sizes and the simplest shape, because they are much easier to weave than a large pot under large pots. In addition, small planters are usually more durable. During weaving It is imperative to ensure that the interval between the nodes is always the same, otherwise the finished product will look ugly. This will immediately catch your eye. Having finished weaving, the ends of the rope can be scorched over a fire so that they do not fray. Or you can simply tie them in a beautiful knot and carefully trim them with scissors.
Weaving flowerpots from twine with your own hands using the macrame technique: practical recommendations
Wicker planters have many advantages over traditional ceramic and plant stands made from other materials. These benefits are as follows:

You can use wicker flowerpots both at home and outdoors (for example, at the dacha). Such pots are a great way to change your interior without spending a lot of time and effort. Therefore, for those who start master the macrame technique You should definitely try making such products. Attention: before using the pot for its intended purpose and placing a pot with a houseplant in it, you need to make sure that this pot is strong, reliable and can withstand the weight of the flower pot. Otherwise, nothing good will come of it. If the product does not look reliable and durable, it is better not to take risks.
Caring for pots
Caring for wicker pots is quite simple: you need to shake out dust from them periodically, since any wicker products are “dust collectors”.
 A flower “dressed” in such a pot will look original in the interior of a living room, nursery or bedroom. For those who have a lot of indoor flowers, we can advise make a series of flowerpots, made in the same style, but with minor differences. You can use a special stand. Attention: the stand for the flower pots must be reliable and stable, it should not wobble under any circumstances.
Making flower pots is one of the easiest ways to master the art of macrame weaving. The main thing is to choose a simple pattern and follow it carefully, and then the novice craftswoman will succeed.
A flowerpot woven using the macrame technique will serve as an excellent gift for those who love indoor plants. To weave such a product, you don’t have to spend a lot of time and effort. The main thing is to master basic weaving skills and hone them to perfection. The art of macrame weaving will appeal to everyone who wants to do something with their own hands and at the same time “unload” their head, get rid of stress and negative thoughts. Perhaps that is why this type of needlework is very popular in our country. You can start with a simple flowerpot and gradually move on to large panels, the main thing is the desire to create and a little patience.
In this article we will talk about how to make original flowerpots for your home and office with your own hands.
Often a home or office is decorated with plants - they are pleasing to the eye and purify the air. In addition, representatives of the flora can be successfully included in the interior, creating your own special style. And various interesting flowerpots will help with this.
Macrame flower pots: master class for beginners, weaving patterns, photos
A macrame flowerpot for a glass vase in which flowers will grow is a rather elegant and unusual idea. For such an airy craft you will need:
- White nylon threads
- Scotch
- Scissors
The operating procedure is as follows:
- Have to take 8 threads, and fasten them.
- Next, the ninth thread of macrame need to re-tie the main threads under the bond. Eventually there should be a loop.


- Now it is necessary divide existing thread bundle for 4 groups. Each of them must, in turn, contain 4 strands of macrame.
- Next you need to adhere to the following weaving patterns:


- At the end of the work it is recommended trim the ends threads, as well as some melt. You can create tassels.


Weaving flowerpots from twine, ropes, jute step by step: diagram
You can use twine, ropes and jute to weave flowerpots in the previous style. Or you can create a miniature bike-pot! And here's what you need for this:

IMPORTANT: You must purchase polymer-based glue.
Operating procedure:
- On cardboard you need draw templates for the wheels. In this case, 3 wheels are required.
- They cut out, and every wrapped with twine.


- Cocktail the tubes need to be cut, departing from the bend approximately 2 cm each. For one wheel will need to create 4 such blanks from tubes.

- Each such workpiece should wrap with twine as tightly as the circles were wrapped.

- That's it 4 straws necessary attach the folds to each other. They are necessary glue.


- Received cross from the tubes you need attach to circle- this will be a wheel. They should be made, as indicated, three.

- Now I need to take more 2 straws. One of them has the top cut off. You need to insert the part that is without a top into the fold of the whole tube.
IMPORTANT: The structure must be wrapped with twine in the same way as the previous blanks.
- Necessary cut 2 more tubes near the fold. But this time you need to retreat 2 cm from the top of the fold and 3 from the bottom.

- Now they are needed connect as shown in the picture, and wrap with twine- this will be the steering wheel.

- Need to prepare one more tube the length of which should reach approximately 11 cm. And her, and the steering wheel, and the wheel are desirable decorate with coffee beans.


- Sticks, pre-decorated with twine, you need insert into wheel just as shown in the picture.

- You can start fastening the wheels together.


- Between the two front sticks attached to the wheel, it is necessary install a piece of another stick. All this then wrapped with twine.


- Remains decorate the pot itself.
IMPORTANT: Since it is small, you can use some kind of cream jar as it.


How to buy floor and wall flower pots on Aliexpress?
Those who want to find something original and ready-made can contact the Aliexpress online store. Beginners are recommended to first read the video instructions.
Now about how to find among the variety of products, treasured flowerpots:

 The first stage of searching for flowerpots on Aliexpress is choosing categories For home and garden, Home decor
 Now you need to click on Home and Garden
 In Categories you need to click on the arrow and scroll through the menu to the end
 Next, select the item For the garden and vegetable garden - in it you can easily find flower pots for your home or office


 You need to click on the category Flower pots and flowerpots
 You can choose a pot of any size - for example, compact, size S, medium, large and even giant.
It is also possible to immediately select a flowerpot depending on its location - floor, tabletop, wall-mounted, hanging models.
Style is another indicator by which you can quickly filter what you need. For example, it is possible to choose a pot of European, modern, classic, rustic, American, Chinese, Mediterranean, cartoon style.
The color palette is amazingly diverse! Available in white, red, green, yellow, blue, black and many other colors and shades.
Do you need a specific material? No problem! Planters are available in plastic, metal, ceramic, glass, wood, stone, plant fiber, fabric and so on.
You can even choose the type of metal - for example, cast iron, iron, tin, etc. Or the type of plastic - PVC, polyresin, polyester and other types. The types of ceramics are also different - for example, porcelain, clay.
Even the type of coating can be filtered - glazed, powder, vinyl, epoxy, etc.
How to make beautiful outdoor pots for indoor flowers with your own hands?
For making gypsum floor planters you will need:
- The plaster itself
IMPORTANT: It is preferable to purchase not construction plaster, but special decorative one. It can be found in stores that sell craft supplies.
- Some unnecessary container
- Material such as fabric, linen or paper
- Glue, pins, staples, tape, rope - in other words, anything to attach
- Scissors
Do the pots are very simple:
- The container needs to be wrapped any available material from those listed above. For example, it could be papier-mâché, crumpled paper. In the example under consideration, the container is small - a tin can. But for a floor planter, you can choose something larger.


- Fabric needed secure on the container.

- Now you need dilute the plaster until liquid consistency.


- Further liquid plaster must be applied directly onto the fabric of the blank under the flowerpot. It is recommended to form several layers.
IMPORTANT: Before processing each subsequent side, you should wait for the plaster to dry on the previous one.


How to make beautiful wall pots for indoor flowers with your own hands?
A whole garland of flower pots will decorate any room. For her you will need:
- Small clay pots made of plastic
- Willow or hazel branches
- Pliers
- Wire
Making a wall composition is not difficult at all:
- Branches you just need intertwine among themselves, forming a wreath from them
- Using wire you should attach pots to branches
IMPORTANT: The wire should be passed through the holes in the pots, then thrown over the clay products themselves.


How to make beautiful hanging pots for indoor flowers with your own hands?
A hanging pot made of multi-colored tubes that glow in the dark will fit perfectly into the modern style. For such a product need to stock up:
- Neon straws at the rate of 8 pcs. for one flowerpot
- Neon threads
- Scissors


Operating procedure:
- So first of all from the threads need to cut off 8 pieces. Each of them must be within from 90 to 150 cm. It all depends on how close you plan to place the flowers to the ceiling.
- Now all 8 threads should to tie so that at the end of the resulting ligament a small brush.
- The workpiece should be placed on the surface and spread out in a special way. It should work out cross shape, on each side of which you will have 2 threads each.


- Now you need to take straws And cut off them where there is a fold.
- These pieces, in turn, also need cut 2 parts.
IMPORTANT: There should be a total of 8 pieces of tubes.
- Every the piece should be put on threads one for each. At the same time, they need to be moved towards the center - to where there is a knot.
- Every 2 threads should be on top of the tubes tie in a knot.
- Again the threads need to be laid out in a cross shape. Only this time you need to connect 2 threads from sections adjacent to each other.
- And we need it again pieces of straws. This time you need to prepare 16 pieces. The length of each should be equal to the length of a small piece of the whole tube before the bend.
- Now 8 pieces need to be threaded, again tied in a knot threads of each section.
- And it needs to be done again cross layout by connecting threads from adjacent sections. And again we need them paint the last 8 pieces of tubes.


- All that remains is hang a flowerpot and place a pot of flowers there.


How to make beautiful tabletop pots for indoor flowers with your own hands?
A small flowerpot made of clothespins looks quite cute and unique. To make it needed:
 Here's what you need for a table planter - clothespins, acrylic paints, decor, glue gun
 Operating procedure:
- First of all, the clothespins will have to be divided into two parts as shown in the picture

 This is how you need to separate the clothespins for the flowerpots
 - Every part is needed paint
- Now all these blanks need to be glued around the pot
IMPORTANT: The pot must be miniature. As an alternative, you can use a cream jar, for example.


- Now you can start decor


Weaving flower pots from newspaper tubes: diagram, photo
Making flower pots from newspapers is quite easy. For this you need the following:

You can start:
- Each package must be marked 8 strips measuring 7 x 30 cm.


- Now these stripes need to be cut out. Place a wooden skewer on the corner of each of them. twisting the paper diagonally. Each tube is needed secure with glue.


The container must be covered with paper– this will avoid gaps in design. You need to glue the tubes to the bottom as shown in the picture. You can also go to the bottom glue the cardboard circle.


- Now you need to cut it out of paper strips measuring 7 by 45 cm. They should also make tubes.
- The already glued tubes need to be pressed against the wall of the container. One of the long stripes should be glued to the side and then weave it around the others.
IMPORTANT: You need to braid as if you were weaving a basket.

- As soon as the bottom of the vertical tubes are braided, we need to continue weaving. But in the opposite direction. If necessary, the tubes should be glued and extended. In this way the entire pot is braided.
- Then you need pierce at the top of the container holes for twine. The easiest way to do this is with a heated nail. Through the holes you need thread the twine, securing it with knots. The knots should be masked with paper.


DIY felt flower pots
This master class was originally dedicated to Easter, but instead of Easter paraphernalia, you can place fresh flowers in the pot. So, needed:
- Felt in two green tones. You can add brown, yellow and white color
- Container-pot
- Hot glue gun
- Scissors
You can get started:
- From dark green felt needed cut the grass.
IMPORTANT: It is advisable to make the blades of grass different in width, height, and shape.
- These are followed by glue with a gun around the container.
- From light green felt is also necessary cut the grass. But this time not in the form of individual blades of grass, but in the form continuous fabric. Moreover, it should be lower than the dark green blank.
- And light green grass needs to be glued.
- Now you need to cut made of brown material boards for the fence, as well as several thin strips.

- Brown pieces are attached glue to the grass at approximately the same distance from each other. They are needed tie with stripes.


- To top it off, you can cut it out of white and yellow felt. details for chamomile. This is an optional step, but it will make the pot look nicer.

 This is what the felt pots look like in the end, in which you can place fresh flowers
 How to make flower pots from an old T-shirt: video
You can also use an old thing to create a flowerpot:
How to crochet flower pots, and from what threads: diagrams with descriptions
Eye-catching pots are desirable from bright yarn, and there are no restrictions on the choice of texture. It is desirable, however, that they be acrylic, thin cotton.
The following scheme will do:

IMPORTANT: Despite the fact that the pattern is presented with a bottom, it does not need to be knitted. After all, many pots are equipped with drainage holes. Perhaps the bottom can be tied if you plan to use a pot for a pot with a moisture-loving plant.
So if bottom still necessary, then you should start knitting with it.
If not, then you should start with chains of air loops, which matches the length of the bottom of the pot. This chain needs to be closed, after which, following the diagram, continue knitting upwards. Wherein in every third row you need to add loops.
Cross with a dash means that the hook is inserted exclusively under the back or front wall of the loop. You will get a nice finish at the bottom and top of the plant pot.
IMPORTANT: If the container is shaped like a cylinder, increases in rows are not needed.


How to decorate flower pots: decoupage, photo
In order to make a cute flowerpot in lilac tones in decoupage style, you will need:
- Decoupage napkins
- Lace
- Glue gun
- White water emulsion
- Brush
- Decor elements


Decoupage is done as follows:
- First you need make a primer. To do this, take equal parts water, water-based paint and PVA glue. All this needs to be mixed thoroughly with a brush.
IMPORTANT: Before starting work, it is necessary to check that the surface of the flower pot is not dirty or covered with anything.
- Then it is added gouache lilac color. Or, if it’s not there, blue and red.
- So colorful the primer must be applied with a brush, ignoring the bottom and rim of the flowerpot.
- After drying of the first layer preferably apply a second one.
- Now you can choose suitable pictures on a decoupage napkin, cut them and separate the color layer.
- Costs try on pictures for the pots, noting where they will be located. These places are needed Cover with glue using a brush.
- Now you need attach pictures while applying glue also on top of them. All irregularities should be smoothed out.
IMPORTANT: Move the brush from the center down.
- The edging should decorate with lace by gluing it. The edges of the lace must be carefully folded, and the junction of the edging must be decorated with decorative elements. A wooden flowerpot stand will decorate any room. Such laconic flowerpots will fit perfectly into a modern style. As you can see, making or decorating flowerpots yourself is not that difficult. There are plenty of options for bringing the most interesting ideas to life, and they will transform any room!
Master class on making flower pots: Video
Ideas for flowerpots: Video